How To Draw A Stage Light
See Lighting Design: The Process for the thinking behind each of the stages of the design.
- 1) Cue List
- 2) Lighting Plan / Light Plot
- 3) Section / Section Plot
- 4) Cheat Sheet / Magic Sheet
- 5) Plot Sheet
- 6) Followspot Plot Sheet
- 7) Hook-Up
- 8) Instrument Schedule
- 9) Colour Call
1. CUE LIST
Purpose: A list of the lighting changes required during the show. The complexity of this will vary according to the needs of the show.
Example: Cue list for a drama
| Cue No. | Action / State | Page |
| LX0.5 | Preset. House lights and dim state on stage | 1 |
| LX1 | On clearance, house lights out and crossfade to light through window | 1 |
| LX2 | As Mr Jones enters, build state | 2 |
| LX3 | End of scene 1, check down to doorway as they exit | 4 |
| LX4 | Scene change state | 4 |
| LX5 | When set, general state for scene 2 – dawn | 5 |
| LX6 | Build state as sun rises | 5 |
| LX7 | Snap blackout | 8 |
| LX8 | Scene change state | 8 |
| LX9 | Scene 3 state | 9 |
2. LIGHTING PLAN (UK) known as the LIGHT PLOT in the US
Purpose: A layout (in plan view, from above) showing the individual lanterns, the bars on which they're hung, their dimmer number, colour and any focus notes, drawn to scale.

The complexity of your lighting plan depends on how much time you have, who you need to communicate with, and the complexity of the show.
Preparing to draw the plan
Stage 1– Once you have the cue list and a plan of the set, and have a clear idea of what is needed for the show and what the lighting needs to do, you can draw a pre-plan.
This is a roughly-drawn plan view of the stage, showing the areas that you've broken the stage into, and any pieces of set that need lighting. Use arrows to show where you want light to come from in each area.
Don't worry about which type of lantern you want to use at this stage.
Stage 2– The next stage is to draw a sketch of the rig, with arrows placed on lighting bars (or in other potential lighting positions) showing where you need lanterns. Again, don't worry about types of lantern at this stage.
Stage 3– Once all parts of the show are covered and you have lanterns in place to do all of those jobs, you can start allocating equipment to each job. Use coloured pens or other codes to identify which jobs are to be shared by a number of lanterns, so that you can see how many lanterns of each type you need. For example, the lanterns doing the general wash from a particular location should all be the same, to ensure it looks completely even. All of the hard-edged spots that appear on stage together, should be the same type / wattage of lantern so they look identical. The same applies for gobo washes etc.
By Hand or CAD?
In the days before computers, the options were limited. You had a number of different plastic templates to choose from, which contained many of the popular symbols. Drawing the plan involved marking out the lighting bars first in pencil, then drawing the symbols. Computer-based plan drafting has simplified the process considerably, and also automated much of the paperwork that is associated with a lighting design.
The standard software for theatrical lighting plan drawing is either Vectorworks or WYSIWYG. Both packages are expensive, and have learning curves. You can also use Capture software to produce a lighting plan. A more straightforward option is LXFree, which enables the production of a perfectly good plan for smaller projects.
MORE INFORMATION COMING SOON.
When drawing the symbols onto the plan ensure you leave enough space around the lantern so that when rigged, it can be focussed in the appropriate direction, and to allow the focusser to get their hands wherever is necessary.
It's not necessary to be absolutely accurate about the angle the lantern should be pointed in, as that happens as part of the focus, but pointing the symbol in roughly the right direction will aid you (and your crew) in seeing what is what.
See Lighting Rigging Positionsfor more information on how to represent lanterns rigged on floor stands, bars and booms on a plan
Essentials:
Title Block
This box should be included, and shows the name of the production, the venue, the scale, your name, the date of the drawing and any revision number.
Key
Each symbol used on the plan should be shown, alongside an indication of the instrument it represents. You should use the correct 'family' of symbol on your plan. All profiles should use profile symbols, all moving lights should use moving light symbols etc, even if you don't have access to the exact symbol for the fixture you're using.
Gels
The Gel requirements for each lantern should be shown as a number within the lantern symbol. A lantern with no gel should have 'o/w' (standing for open white) written inside it. If you're using Rosco gels, indicate this by writing R in front of the number. Lee gels should have L in front. This avoids confusion when mixing between the two numbering systems.
Focus Note
A Focus Note for each lantern should be written at the front of the lantern – this is a very brief indication to the crew (and a reminder to you) of the function of the lantern.
Example focus notes, with an explanation in brackets:
DSC POOL (downstage centre pool)
A (area A – part of the general cover)
B/L (backlight – coming from upstage)
CHAIR DL (downlight on the chair)
There's a collection of historic lighting plans from the Theatre Royal Drury Lane and the Northcott Theatre, Exeter in the archive section of this site.
3. SECTION (UK) / SECTION PLOT (USA)
Purpose: A scale side-view of the stage and lighting rig, showing the heights of the lighting bars, and any masking, to check clearance of scenery and that lighting angles will work.
Coming soon
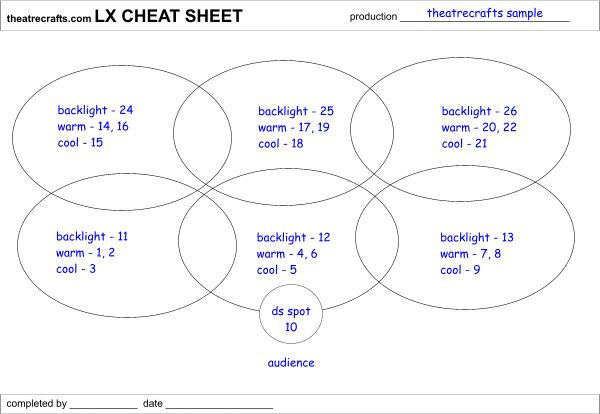
4. CHEAT SHEET / MAGIC SHEET
Purpose:A simplified version of the lighting plan (see above) showing areas and the dimmer numbers that are lighting them – used by the lighting designer as a quick reference at the production desk.

Using a DMX input device (such as ArtNet) and Virtual Magic Sheet software from West Side Systems, a responsive magic sheet can be created on your laptop, which responds to DMX data produced by the lighting desk.
Many computerised lighting desk, including the ETC EOS range, can produce an electronic magic sheet on screen, which can respond visually to the output of the desk, all within the show file. Tremendously powerful and very useful.
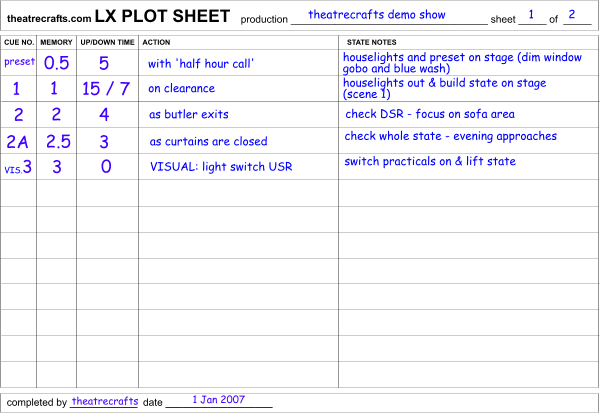
5. PLOT SHEET
Purpose:A list of the cues to be performed by a lighting desk operator, enabling him or her to make notes about specific actions to perform, and to keep track of the show as it's running.

- Download Computerised Lighting Desk Plot Sheet (PDF)
6. FOLLOWSPOT PLOT
COMING SOON
7. HOOK-UP
A list of circuits around the theatre showing which dimmers they are connected to.
8. LANTERN SCHEDULE / INSTRUMENT SCHEDULE
A list of the lanterns in use in the production.
Example coming soon.
9. COLOUR CALL
A tabular layout showing gel numbers down one side, and colour sizes (or lantern names) down the other, so that the member of the crew preparing gels for the rig can ensure she/he has the correct number. This call sheet also enables the crew to check that enough gel is in stock on receipt of the lighting plan.
Example coming soon.
Author: Jon Primrose
Last updated: June 2021
Keywords: lighting plots, lighting plans
How To Draw A Stage Light
Source: https://www.theatrecrafts.com/pages/home/topics/lighting/lighting-design-paperwork/
Posted by: terrellsuaing.blogspot.com

0 Response to "How To Draw A Stage Light"
Post a Comment